Plasma Metal Polishing Machine Bayi specializes in plasma polishing equipment. We provide efficient polishing equipment to meet your various polishing needs. Plasma polishing machine can complete a large number of metal surface treatment work in a short time. It realizes batch polishing and improves production efficiency for you. After the metal is plasma polished, it has a much smoother surface. It can achieve a smooth, glossy, or mirror effect. We are a China plasma polishing machine manufacturer. Our polishing equipment has a high service life, low failure rate, and low maintenance cost. And it does not produce noise and pollution. We can also according to your polishing needs. We can customize the right plasma polishing solution for you. Contact us to get a favorable plan now. Metal Polishing Machine,Metal Polishing Equipment,Plasma Polishing Machine,metal buffing machine,Metal Surface Polishing Machine Dongguan Bayi Automation Equipment Co., Ltd , https://www.bayipolisher.comMetal Surface Polishing Machine
When diving into a discipline like photogrammetry—an art rooted in complex science—it's incredibly valuable to learn from the experiences of those who came before you. By understanding the tricks and techniques developed through trial and error, you can overcome early challenges more efficiently and achieve better results faster.
This blog post is designed to guide you step by step through using the Elios 2 drone for indoor photogrammetry. While outdoor photogrammetry has its own set of best practices, indoor environments present unique challenges such as the absence of GPS signals and limited or inconsistent lighting. We’ve compiled field-tested tips to help you capture high-quality images and follow an effective flight path, ensuring success with your indoor mapping projects.
### Image Quality
Indoor photogrammetry relies entirely on visual data since GPS is unavailable. Therefore, image quality is crucial. Here’s how to optimize it with the Elios 2:
- **Set the camera resolution to 4K**. Higher resolution ensures more detail, which is essential for accurate 3D modeling. You can always downscale later if needed.
- **Maximize lighting intensity**. The lights automatically turn on at full brightness when you take off—don’t reduce them.
- **Avoid tilting the camera below -30°** to prevent the cage from obstructing the view.
- **Adjust exposure compensation (EV)** to 0. In large spaces, fly close to walls and face them to avoid underexposure.
- **Keep ISO low** to minimize noise. Flying closer to objects can help lower the ISO naturally.
- **Limit exposure time** to 1/60 or faster to avoid motion blur. Closer proximity to objects can help shorten exposure time.
- **Fly slowly** and avoid sudden rotations to reduce motion blur.
- **Use fixed focal length** for consistent image scale, which is critical for photogrammetry.
The **Photogrammetry Flight Mode** helps automate many of these settings, including maximizing LED intensity, fixing EV to 0, reducing yaw speed, and keeping the camera pitch stable.
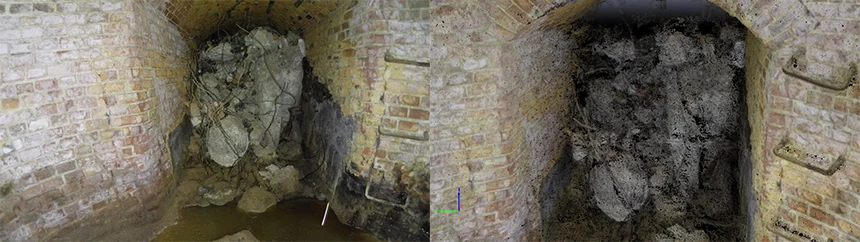
*Data capture (left) vs 3D model (right)*
[Related read: What Is Simultaneous Localization and Mapping (SLAM)?]
### Flight Trajectory
A well-planned flight path is key to successful indoor photogrammetry. It should account for the asset's shape, coverage area, and level of detail required.
- **Explore first**. Use one battery to scout the area, identify landmarks, and plan your route.
- **Follow a grid pattern**. This ensures consistent coverage and helps maintain image overlap. Choose horizontal or vertical lines based on the environment.
- **Choose the right distance** from walls or objects. A shorter distance improves detail (lower GSD), but too close may make it hard to stay aligned.
- **Maintain a constant distance** from surfaces. This helps software match images more accurately.
- **Ensure proper overlap**. Aim for 50% lateral overlap to improve model accuracy.
- **Keep visual continuity**. Avoid abrupt turns or sudden changes in scene that could disrupt image alignment.
- **Close the loop**. Revisit areas already captured to help the software correct drift and improve accuracy.
[Download the dataset of a brick chimney](http://bsg-i.nbxc.com/blog/8c218e453c3eb0f1b6222139ec7e96af.png)
### Train, Try, and Persevere
Indoor photogrammetry is not easy—it requires skill, patience, and practice. But with the right approach, you’ll quickly improve and start producing high-quality 3D models. Don’t be discouraged by initial challenges; keep experimenting and refining your technique.
This article is part of a series on photogrammetry:
- Why use photogrammetry to build 3D models of indoor spaces?
- Mining drones: Elios 2 creates photogrammetric models
- Building 3D models with Elios 2: how to acquire appropriate data for photogrammetry
- Building 3D models with Elios 2: processing data with photogrammetry software
- Elios 2 Tested for Indoor Stockpile Volumetry, Produces 3D Maps Accurate to within 1 Centimeter
Whether you're new to photogrammetry or looking to refine your skills, this guide will help you get started and succeed in the world of indoor mapping.